~~HERE'S TO POPPY~~ (* and a note)
Our grandchildren had a name for my husband Alan; it was "Poppy."
And this name was 'adopted' from his own grandfather - who was called Poppy as well.
After Alan passed away, a "Scrapbook.com" friend of mine made a beautiful card with a sweet 'poppy' focal point. I happened to share with some of my SB.com friends about Alan being called poppy, and she ended up sending me the card! To use as I wanted. Thank you Laura : )
I had hoped to use it for a lay-out of Al, but when I ran across this photo of grandpa (Poppy); I felt some inspiration and created this. The reddish foreground paper and also the poppy embellishment were from Laura, with a few of my tweaks~
His real name was Charles. Grandma called him Charlie (or Chuck if she was 'not happy'!lol : ) but to the rest of the world, he was simply Poppy~
Born in 1911 in Brooklyn Heights Ohio (near Cleveland I think.) He was the middle child with a sister older and a sister younger.
As a young man he was a produce seller at local markets and became a gardener for a private (well-to-do) family.
He later built and started his own greenhouses and was self-employed until the greenhouses were sold in 1981.
This photo is a bit closer. He looks like he's a little 'spit-fire' in this shot!! : ) But really, he was the most gentle man I knew. It is his picture I featured here > GENUINE on my blog in January~
I have been working on a few décor changes around the house and I hung 2 -100 year old windows in my living room; and am adding family photo's to them. This small lay out will be proudly hung there : )
Thanks so very much! For stopping in today~
I am sure most of you know I do not have internet @ home - and so when I get to work on Mondays, I sometimes see 20+ posts from my friends! and I get a bit overwhelmed; wanting to get a visit in to each one. Please know I do stop in! and hope to comment if there is time~
God bless, Karen
***May I please add, for any of you who have read to the bottom here : ) That it has been difficult for me to blog lately; well, for a while. Let me tell you why~
My grief is still so real, and difficult. I often feel like "nothing really matters" - although I know that that is not true~ I still feel it - and that makes for a hard time creating, and a hard time in expressing myself.
Yet, in these waves of pain, I know the Lord is with me and teaching me; thru the grief and pain that I experience. It is the place to grow and learn. If I don't 'experience' it, how can I move past it?
Each one of us is unique in how we grieve, I know that, but (for myself) I must 'feel' it, in order to move beyond it; and it comes in waves for me. Perhaps that is a good thing! as God knows how much I can handle (and it still be beneficial - not overwhelming) vs. me trying to guess my way through all this and navigate my own course.
So, Thanks be to God! for His guidance and safe-keeping over me.
And a full-hearted Thank You to all my dear blog friends; for your love and support!
Though at this time I am not the full/real 'me', I hope you are seeing glimpses' of
her, : ] and some day we can truly meet~
As I journey on . . .
God bless,
Karen
Monday, March 21, 2016
Wednesday, March 9, 2016
Mini Observation Journal Notebook~
(* am having trouble w/Blogger and can't change the font or size! : ( grrr
Hello dear friends~ I have been spending time around blog land and what do you suppose the "buzz word" is these days!?! lol - -
SPRING!
Well, I have mentioned to several of you that around here, (in CO - or at least in El Paso county where I live) we don't get too hopeful or excited about spring just yet. : ) March and April can be our snowiest months. Not always, but often. We have a rule in our house; no planting til after Mothers Day~
But still, the spring bug has bit - and my hopes are for some creativity real soon.
Well, she probably would have found burlap sacks to cut up, scraps of twine and paper, lace or fabric,
tags, twigs and lots of textural elements!
Thus my book includes all that and a few extras~
Mulberry paper, twill, corrugated board, canvas, velum and such.
A white twill bow ties the book together~ (I almost always 'gotta have a bow' : }
The book cover (above) is layered with Velum, a canvas flower under that, layers of dark brown and pale green Mulberry paper, and the burlap cover. I bought a roll of 6?" wide burlap, which was conveniently finished on the edges~
If you'd care to, please keep scrolling down; I have lots of pages to share : )
Ok - here is the inside front cover and page one of my observations book.
The left side is a pretty tissue paper, decoupaged on to the inside cover with Modge Podge.
On the right is a pocket for notes.

Pages 3 & 4 have 'pull out tags' for photo's, sketches and journaling. The large pocket on the left (holding the tag) is made from Velum.
Page 11 has lots of ephemera and papers for journaling, sketches or notes. Page 12 has an envelope pocket attached to hold a few findings or treasures! Most of these papers are from Graphic 45.
(* am having trouble w/Blogger and can't change the font or size! : ( grrr
Hello dear friends~ I have been spending time around blog land and what do you suppose the "buzz word" is these days!?! lol - -
SPRING!
Well, I have mentioned to several of you that around here, (in CO - or at least in El Paso county where I live) we don't get too hopeful or excited about spring just yet. : ) March and April can be our snowiest months. Not always, but often. We have a rule in our house; no planting til after Mothers Day~
But still, the spring bug has bit - and my hopes are for some creativity real soon.
I'm hoping you've been able to take some time to create lately??
I've been seeing some beautiful things out there recently!
I am still struggling in the 'creating' department : J (friends I'm still really hurting. . .)
- - So, I'm sharing something I created two summers past.
But let me insert here - I am sharing my book @ http://appleapricot.blogspot.com/2016/03/simply-neutrals-19-romantic-ponderings.html
For Wen's "Simply Neutrals Tuesday" link party!!!!
You will find beautiful photo's, creations and artistry - with a neutral color palate! every other Tuesday over at Wen's blog "AppleApricot."

Please join in on the fun!
Well, about my book - - It is a very 'organic-y' (I made that up - LOL : ) journal/observations book.
(The book is about 8"X5" maybe) For logging observations, or, just for journaling some thoughts while out in nature!
I tried to imagine what a girl (maybe 100 years ago) might have put together for collecting bird and butterfly information~Well, she probably would have found burlap sacks to cut up, scraps of twine and paper, lace or fabric,
tags, twigs and lots of textural elements!
Thus my book includes all that and a few extras~
Mulberry paper, twill, corrugated board, canvas, velum and such.
A white twill bow ties the book together~ (I almost always 'gotta have a bow' : }
The book cover (above) is layered with Velum, a canvas flower under that, layers of dark brown and pale green Mulberry paper, and the burlap cover. I bought a roll of 6?" wide burlap, which was conveniently finished on the edges~
If you'd care to, please keep scrolling down; I have lots of pages to share : )
Ok - here is the inside front cover and page one of my observations book.
The left side is a pretty tissue paper, decoupaged on to the inside cover with Modge Podge.
On the right is a pocket for notes.
Pages 3 & 4 have 'pull out tags' for photo's, sketches and journaling. The large pocket on the left (holding the tag) is made from Velum.
Pages 5 and 6~
On the left side I 'fussy-cut' a tree branch from some (click > ) Graphic 45 papers , The bird is a die cut piece pre-made, I think also from Graphic 45. The fibrous paper I believe is called Mulberry paper and was gifted to me from a dear friend at Scrapbook.com; where I have a gallery.
Page 7 & 8; pg7 has a pocket, and the bird house on page 8 is a stamp - isn't it so cute!? Twigs are from my elm tree~
Page 9 & 10 have a few (paper) butterfly specimens : ) on white corrugated board, - and room for notes.
Just some fussy-cut stuff on pages 13 & 14~ The metal clip on the right will help hold some scattered ideas or little items.
Here is the back side of the Observation Notebook. There's a pocket for a pencil and paper; and a paperclip for notecards; etc. The paperclip is from Hobby Lobby ( > )copper bookmark clip
I cut an image of an egg and glued it on the paper clip; finishing it with Glossy Accents.http://rangerink.com/?product=inkssentials%e2%84%a2-glossy-accents%e2%84%a2
Thank you for looking in today! I am so blessed by your visit.
Have a wonderful week and I hope it is filled with peace and love.
~Karen
Tuesday, March 1, 2016
"Generations" Wedding Album
Dear friends, I thank you for joining me today!
I'm afraid I've been away from my blog lately; more than I'd like to be. But aside from 'no home internet' these days, my parents are not at all well. Dad was in the hospital this last week end, and mom totally depends on him.
My siblings and I have been caring for them as best we can.
It may not be long before we move them to a facility that can cook and clean for them; we shall see.
Well, - I am bringing back something I had posted in September 2015 I think.
I made this mini album (it is about 6"X6") for myself several years ago. It contains old wedding photo's! of members from my husbands family and my family as well. Several generations are in here.
The album is made of: White corrugated board, a mix of scrapbook papers- (mostly Prima paper) http://www.primamarketinginc.com/ from the 'Almanac' and 'Printery' paper collections. Also handmade flowers, some ribbon, chipboard, glitter glass, stickles, rubber stamping, and beads... : ) you get the picture! LOL
Here is the cover:
The tag pulls out to the left with some information on it. Most of the pages have 'hidden' pull-out tags with info about the corresponding photo. The chipboard mannequin is from Blue Fern Studios http://bluefernstudios.com/store/index.php?main_page=index&cPath=1 and has a sprinkle of glitter glass. I added a silhouette of black cardstock behind it~
I will be sharing this with Wen at Apple Apricot blog:

(click >) for her Simply Neutrals Tuesday
Bi-monthly link party!!
Please stop in to see some wonderful 'neutral' projects and photos~ There is a bit of everything shared there and so much inspiration! Perhaps you would join in and share with us!?!
Here is a page of my fathers parents:
I made the flowers. The teeny letter 'tickets' are from the (Prima) Almanac paper collection. We called grandpa "Pops" & he was quite a 'salty ol' dog! LOL~
Here are my mothers parents. It's hard to see the back drop behind them in this photo, but up close it is amazing! So vintage~
Both my mothers parents are 100% French : ) [my dads mother was too.] All of my French great grandparents hail from Canada; and their parents came over from France~ ( All of my grandparents were born in Michigan)And here are my parents below. Mom was so beautiful : ) They were so in love - and still are after 62 years of marriage! *sigh*
The flowers are all hand made and the butterfly is Blue Fern chipboard. Papers are Prima.
Here are my great grandparents on my dads fathers side. (The German side:)
I heard these two were quite the pair! They look mischievous to me! LOL! The buttons are vintage; from grandma's jar. Did a bit of sewing machine stitching too~
Here comes Alan's grandparents! (him mom's parents)
The original "Poppy." He worked his own greenhouses (on their property) until he retired.
He could make A N Y T H I N G grow~ Grandma was a kindergarten teacher for 26 years!
And here is Grandma's parents. This, of course, is not their wedding photo (we don't have one) but a 50th Anniversary photo.
Westy (great grandpa) was another "Salty Dog!" ; ) and though great-grandma "Oma" was already gone when I met Alan, I did get to meet Grandpa "Westy". There are 'tales' he joined (snuck in to) the Navy when he was only 16 yrs. old~
Alan's parents' wedding:
His dad's parents on the left and Poppy and Grandma on the right. For this page I used 'My Minds Eye' paper; some of my very favorite, from their (retired) Lost & Found collection.
Also used some wedding applique and hand made flowers.
My dad's mom, Alberta, was sooo dear to my heart. We became very close when they moved out to be with us in Colorado. She was a dear soul.
There are a few more but I think I'll stop right here : ) Thank you so much for your visits and friendship!! My heart feels a bit torn - wanting to spend more attention to my blog, but knowing the important things must come first! I know God will help me sort everything out and help me set my priorities in order~
Bless you all! and thank you for your thoughts and prayers~
Karen
Tuesday, February 16, 2016
Margaret Mary~ and Simply Neutrals Tuesday!
Hi friends! So happy you stopped by today. We are enjoying warmer weather this week! WHEW! : ) LOL
Let me tell you just a little bit about Margaret, the Great-Aunt of my late husband.
She was born in Philadelphia in 1926; the middle of 3 sisters~ She will be 90 years old in April!
And is currently living in North Carolina; though Cleveland OH was her home for most of her life.
Her parents were born in the USA, but her grandparents were from Czechoslovakia.
I have photo's of some of her family, including Alan's grandmother Catherine, (Margaret's older sister : )
and I hope to do more scrapbooking with those photo's sometime this year~
I just couldn't help myself when I saw her sweet face, the baby doll!, and her shoe's and 'scrunchy' sox! I just had to do something right away.
Look, Margaret even has a little bracelet on her right arm. Such a darling pose. PS - she always went by "Margaret" and not Marge or Margie~
She is sitting in a big dark chair, in front of a window. I like her hair all dressed in ringlets too~ I apologize, when I copied the photo, the reprint pulled the violet hue's: (
I dusted the project with silver German Glitter glass, Diamond Glitter glass, and scattered some pearls, beads and a few gems~
I used some beautiful vintage lace from Liz! http://lululizinlalaland.blogspot.com/
(thank you so much Liz!) and some other lace, seam binding, linen, canvas and cotton fabric I had in my basket~
I hope to create a wall hanging with this - by adding it to some sturdy black board & adding a ribbon hanger; or perhaps make a true 12 X 12 lay out with it; to be framed. I am just not sure yet~
I am entering this post in Wen's Simply Neutrals Tuesday! Her bi-monthly showcase of all things neutral! Please stop in her blog to see the latest link-ups there~ Fabric projects, paper, photo's...
http://appleapricot.blogspot.com/
I sure hope you know what an encouragement you are to me!! Thanks ever-so-much for the visit today~ May God bless you, Karen
Hi friends! So happy you stopped by today. We are enjoying warmer weather this week! WHEW! : ) LOL
Let me tell you just a little bit about Margaret, the Great-Aunt of my late husband.
She was born in Philadelphia in 1926; the middle of 3 sisters~ She will be 90 years old in April!
And is currently living in North Carolina; though Cleveland OH was her home for most of her life.
Her parents were born in the USA, but her grandparents were from Czechoslovakia.
I have photo's of some of her family, including Alan's grandmother Catherine, (Margaret's older sister : )
and I hope to do more scrapbooking with those photo's sometime this year~
I just couldn't help myself when I saw her sweet face, the baby doll!, and her shoe's and 'scrunchy' sox! I just had to do something right away.
Look, Margaret even has a little bracelet on her right arm. Such a darling pose. PS - she always went by "Margaret" and not Marge or Margie~
She is sitting in a big dark chair, in front of a window. I like her hair all dressed in ringlets too~ I apologize, when I copied the photo, the reprint pulled the violet hue's: (
The chipboard used here is from Blue Fern Studio's ---> http://bluefernstudios.com/
and I believe the large piece is called "Organic Vine Corner."
I painted the chipboard with Gesso, then added Tim Holtz:
*Crackle medium,
*White Liquid Pearls
*Walnut Stain distress ink
(found here)---> http://shop.rangerink.com/
I dusted the project with silver German Glitter glass, Diamond Glitter glass, and scattered some pearls, beads and a few gems~
I used some beautiful vintage lace from Liz! http://lululizinlalaland.blogspot.com/
(thank you so much Liz!) and some other lace, seam binding, linen, canvas and cotton fabric I had in my basket~
I hope to create a wall hanging with this - by adding it to some sturdy black board & adding a ribbon hanger; or perhaps make a true 12 X 12 lay out with it; to be framed. I am just not sure yet~
http://appleapricot.blogspot.com/
I sure hope you know what an encouragement you are to me!! Thanks ever-so-much for the visit today~ May God bless you, KarenThursday, February 11, 2016
The REMAINS of a day . . .
Hi there! And welcome to my blog today~
We had a bad snow storm on Monday and Tuesday; February 1st & 2nd in Colorado Springs, CO USA~
I finally got out and around to take some photo's; but these are from Friday Feb 5th.
And here it is, Feb 11th! and I'm just now posting~ *sigh* Lots of the snow has melted; but really, a majority of it is still here - probably till spring~
I apologize for the signs and wires in some of the pic's! but I could not find a place to park where they could be avoided. God has blessed us - as inconvenient as I know it was for so many - but we needed the moisture so badly! I am grateful for the 'melt' and the water that is now soaking into our land. We are semi-arid and always welcome snow or rain.
We often have beautiful blue skies like this! Isn't it so pretty!?

(in the photo above) - We are looking west. I work about a mile west from here; down in that valley~
Above, can you see the snow-covered road traversing horizontally across the mountain!?
Below is our beautiful Pikes Peak mountain -The Rocky Mountain range runs vertically through (basically) the western half Colorado. We have 52 mountain peaks that are over 14,000 feet!
Many people make it a mission in life to climb them all~ WHEW! (no, I haven't ; ) but some of my family, including my father, have climbed a good many of them.
I thank you for taking a peek in today!!! I hope you enjoyed these photos of our beautiful part of the country~ Blessings to you for a wonderful week! ~Karen
Hi there! And welcome to my blog today~
We had a bad snow storm on Monday and Tuesday; February 1st & 2nd in Colorado Springs, CO USA~
I finally got out and around to take some photo's; but these are from Friday Feb 5th.
And here it is, Feb 11th! and I'm just now posting~ *sigh* Lots of the snow has melted; but really, a majority of it is still here - probably till spring~
I apologize for the signs and wires in some of the pic's! but I could not find a place to park where they could be avoided. God has blessed us - as inconvenient as I know it was for so many - but we needed the moisture so badly! I am grateful for the 'melt' and the water that is now soaking into our land. We are semi-arid and always welcome snow or rain.
We often have beautiful blue skies like this! Isn't it so pretty!?
(in the photo above) - We are looking west. I work about a mile west from here; down in that valley~
Below is our beautiful Pikes Peak mountain -The Rocky Mountain range runs vertically through (basically) the western half Colorado. We have 52 mountain peaks that are over 14,000 feet!
Many people make it a mission in life to climb them all~ WHEW! (no, I haven't ; ) but some of my family, including my father, have climbed a good many of them.
I thank you for taking a peek in today!!! I hope you enjoyed these photos of our beautiful part of the country~ Blessings to you for a wonderful week! ~Karen
Monday, February 8, 2016
Sharing some Valentine's cheer!
Hello friends and welcome to you today~
Just a quick post to share a few Valentine tags I made for my family.
I wish so much I could stay and really 'chat!' but *sigh* work is calling my name. So I will leave you with these photo's and wishes for a wonderful week ahead! I think we will be warming up a bit here in Colorado; so I am happily looking forward to that! ~Karen
Using a black (small size) Graphic 45 Tag with metal eyelet. Also using Graphic 45 papers.
Here is their website: http://www.g45papers.com/products/time-to-flourish-category
I love round and full bows; I know - I've mentioned that before ; ) !!
My inspiration for bows often comes from these 2 great ladies:
http://iralamija.blogspot.com/ Beatrize Jennings (who is currently on the Frank Garcia design team)
and
http://cherrysjubileehome.blogspot.com/ Cherry, who is on several design teams as well.
Both encourage and inspire me with their retro/shabby-chic styles and use of ribbon in their designs~
THANKS Ever-So-Much for peeking in today. Hugs to you and may God bless you this week!
Karen
Hello friends and welcome to you today~
Just a quick post to share a few Valentine tags I made for my family.
I wish so much I could stay and really 'chat!' but *sigh* work is calling my name. So I will leave you with these photo's and wishes for a wonderful week ahead! I think we will be warming up a bit here in Colorado; so I am happily looking forward to that! ~Karen
Using a black (small size) Graphic 45 Tag with metal eyelet. Also using Graphic 45 papers.
Here is their website: http://www.g45papers.com/products/time-to-flourish-category
I love round and full bows; I know - I've mentioned that before ; ) !!
My inspiration for bows often comes from these 2 great ladies:
http://iralamija.blogspot.com/ Beatrize Jennings (who is currently on the Frank Garcia design team)
and
http://cherrysjubileehome.blogspot.com/ Cherry, who is on several design teams as well.
Both encourage and inspire me with their retro/shabby-chic styles and use of ribbon in their designs~
Don't you like a bit of twine? And the bow is layered; with thin and wide ribbon and twill tape.
Below I'm using Graphic 45's "Raining Cats and Dogs" paper collection!
Such a sweet retro-vintage look .
The tag is a large base (black) from Graphic 45.
I created a pocket on the bottom; to insert a gift card or a few tags & photo's.
A bit of Washi tape along the side.
And finally another large tag with some papers from Graphic 45's "A Time To Flourish" collection. This is February paper. I 'fussy-cut' the 'pocket' and inserted a couple of tags inside~THANKS Ever-So-Much for peeking in today. Hugs to you and may God bless you this week!
Karen
Wednesday, February 3, 2016
Delight in the Lord . . .
Hello and welcome today!
I have been 'stuck inside' my home for 3 days! - waiting out the big snow storm~
I shoveled 2 times on Monday; and then - -just gave up! It snowed so much, it blanketed us with 18 inches.
I finally made it to work today and was able to find some blogging time~
This is a card I made for my sister; she is going to a Ladies Retreat soon, and I wanted to tuck this into her suitcase : )
The papers are from (click >) Liz, from a generous give-away I was so blessed to receive a while back!
They are all vintage paper layers. And the laces are also from Liz; purchased through her latest auction in December~
The center 'frame' is a chipboard piece; and so is that sweet little bird in the party hat! Isn't he so cute? : ) He looks delighted~ The Chipboard is from My Mind's Eye brand.
(I added tiny bits of Washi tape to the chip) I stamped the postage; using a pale blue ink from:
http://timholtz.com/ (weathered wood)
I will be entering this in Wen's Simply Neutrals Tuesday link up party!
I hope you will HOP right over (^) to see the neutral links she has in store!
Always beautiful and inspiring~

Dear friends, I am wondering, second guessing my decision to stop my internet @ my home.
I miss it much more than I thought I would; and I am finding my spare time @ work does not feel sufficient to do my blog, AND my dear blog friends, justice! I so want to take my time; visiting and enjoying blogland - while taking careful pains to make sure my own blog is something enjoyable and uplifting.
Hmmm; I am wondering now if I did the right thing . . .
I will give myself a little more time, prayer and re-evaluate!
I am so thankful to you for stopping in today~ Your visits' are so much appreciated!
Take time to enjoy the weather! : ) I keep telling myself I need to carry my camera with me at all times. The snow covered mountains were so beautiful on the way into work - I wanted to show you what I saw~ Perhaps tomorrow I will have time to stop and click ; )
Hugs to you, Karen
Wednesday, January 27, 2016
Covering books with scrapbook paper~

Hi there! and welcome to my blog~ How is your week going thus far? I hope you are not buried in snow! : l My heart and prayers go out to you in the eastern part of the US~
We are having mild winter weather in Colorado USA right now. Cold and dry. So typical this time of year. *sigh*
I would welcome rain OR snow! We really need the moisture here~
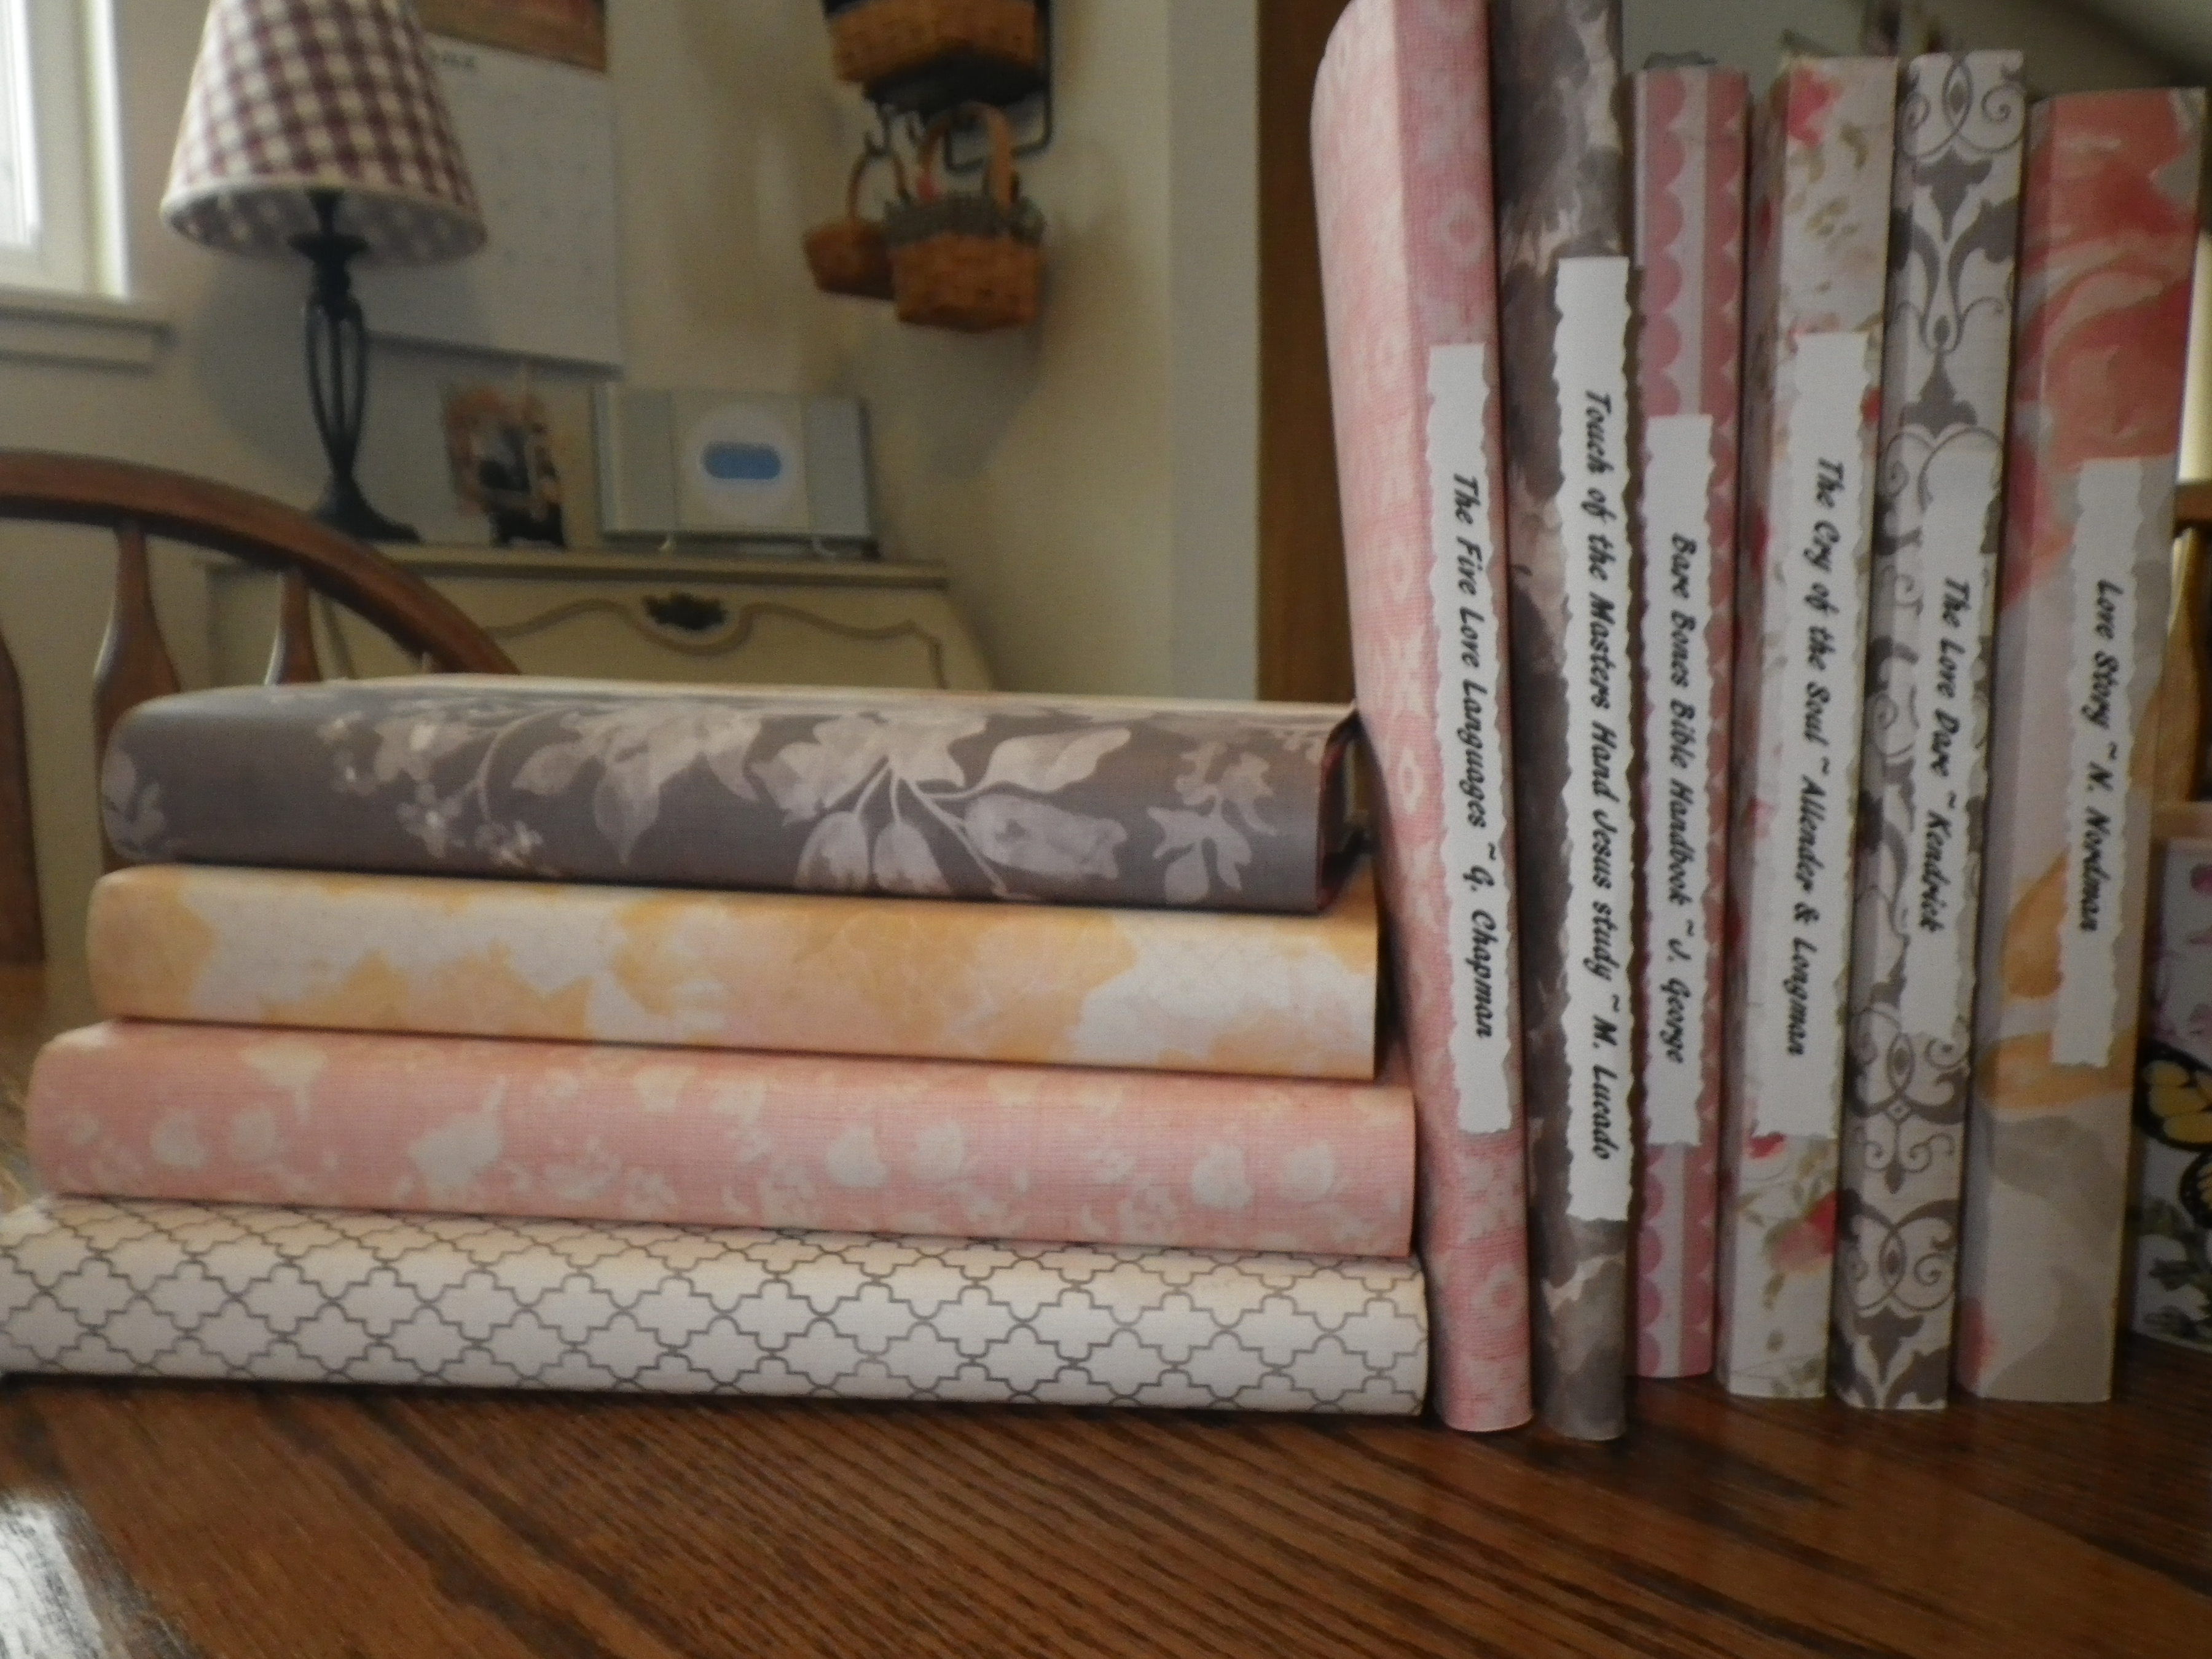
I had this pretty scrapbook paper pack of 12"X12" from My Minds Eye brand (In Bloom) collection, and I decided to cover a few dozen books with it~
Works so well - with just a few steps~
I'm not a very good "teacher!" but let me try to explain what I did. (Perhaps I should have taken pictures along the way! (:z hello, Karen?) But I was on a mission! and didn't think to share this until it was done~

1) I measured the height of the book and cut the paper to fit exactly.
2) I measured all around the width of the book, adding about 2 inches to each side (width-wise) for 'fold over.'
If the paper wasn't 'wide' enough to wrap around the book, I zig-zag stitched strips of coordinating paper to extend the width. Click on the photo below and I think you can enlarge the photo. *note - I did not overlap the papers; I 'butted' them up against each other and zig-zag stitched them together~
3) I then 'wrapped' the paper around the book and mark where the folds should be. *I used a scoreboard for crisp 'fold' lines; but you could just draw a pencil line on the inside of the paper and make your folds 'around' the book.

4) I used Washi tape (it has a light 'tack' and is removable) to adhere the covers to the inside of the book as you can see below. **These are 'every day' books! I wouldn't do this with rare or special ones: )

4) I opted to add strips of white cardstock to the spine with title and author.
I just printed the info on white cardstock and cut them out with wavy scissors : ]


They look so pretty on my bookshelf! Much better than that unappealing eclectic mix~ It brings a sense of 'cohesion' to my bookcase.
If you have any Questions, please feel free to ask. I know my directions are probably lacking.
This was an easy project, really. Took about 6 or so minutes per book, once I got the technique down : ) I ended up covering about 25 books in 2 evenings~
I used:
1 12X12 scrapbook paper pack
1 Lg roll of Washi tape
Scissors
Paper trimmer
12X12 scoreboard and bone folder
*To attach the labels on the spine I used an adhesive runner.
*I did reinforce the stitched seams on the inside (backside that doesn't show) with a strip of Washi as well.
** Remember, these are 'everyday' books!!! Though Washi tape is removable, I would not do this for rare or antique books of course.
Thanks for peeking in! I hope you have a blessed rest of the week~
Karen
Hi there! and welcome to my blog~ How is your week going thus far? I hope you are not buried in snow! : l My heart and prayers go out to you in the eastern part of the US~
We are having mild winter weather in Colorado USA right now. Cold and dry. So typical this time of year. *sigh*
I would welcome rain OR snow! We really need the moisture here~
Please let me share with you a project I undertook last year.
I love to read. And not just on my Kindle : ) Although I do love that too~ I like the feel of a real book in my hands. I like bookmarks! and how a book sitting on the table reminds me to read.
Well, I have a bookcase in my bedroom which was very - - unsightly!
With books of all shapes, sizes and colors - it just bugged me. I had seen several articles and 'Pins' about covering books - so I decided to try my own idea!
Works so well - with just a few steps~
I'm not a very good "teacher!" but let me try to explain what I did. (Perhaps I should have taken pictures along the way! (:z hello, Karen?) But I was on a mission! and didn't think to share this until it was done~
1) I measured the height of the book and cut the paper to fit exactly.
2) I measured all around the width of the book, adding about 2 inches to each side (width-wise) for 'fold over.'
If the paper wasn't 'wide' enough to wrap around the book, I zig-zag stitched strips of coordinating paper to extend the width. Click on the photo below and I think you can enlarge the photo. *note - I did not overlap the papers; I 'butted' them up against each other and zig-zag stitched them together~
3) I then 'wrapped' the paper around the book and mark where the folds should be. *I used a scoreboard for crisp 'fold' lines; but you could just draw a pencil line on the inside of the paper and make your folds 'around' the book.
4) I used Washi tape (it has a light 'tack' and is removable) to adhere the covers to the inside of the book as you can see below. **These are 'every day' books! I wouldn't do this with rare or special ones: )
4) I opted to add strips of white cardstock to the spine with title and author.
I just printed the info on white cardstock and cut them out with wavy scissors : ]
They look so pretty on my bookshelf! Much better than that unappealing eclectic mix~ It brings a sense of 'cohesion' to my bookcase.
If you have any Questions, please feel free to ask. I know my directions are probably lacking.
This was an easy project, really. Took about 6 or so minutes per book, once I got the technique down : ) I ended up covering about 25 books in 2 evenings~
I used:
1 12X12 scrapbook paper pack
1 Lg roll of Washi tape
Scissors
Paper trimmer
12X12 scoreboard and bone folder
*To attach the labels on the spine I used an adhesive runner.
*I did reinforce the stitched seams on the inside (backside that doesn't show) with a strip of Washi as well.
** Remember, these are 'everyday' books!!! Though Washi tape is removable, I would not do this for rare or antique books of course.
Thanks for peeking in! I hope you have a blessed rest of the week~
Karen
Subscribe to:
Posts (Atom)